For the graduation, my son asked if I would make a cake for the class. Instantly ideas started buzzing around in my head and I was thrilled to do it. No problem. So fast forward to a few days prior to graduation. I asked my son to give me some details about what they'd like in a cake, like flavor, ideas or anything special. He then mentioned a few allergies some of the young men had along with it needed to feed 200 people. It was about then that I think I went unconscious. For some reason, I just assumed that the cake was for 31 young graduating men and women and I had never given a second thought that all their families would be present for graduation too. So after I came to, I went into freak out mode. At that moment I knew I would need a full sheet cake board, box and some extra supplies, like 10 cake mixes (especially with time constraints, I wasn't about to make a scratch cake) and whatever else like forms for making the candy decorations.
But after my trip to the cake supply store, I felt much better just being prepared. Since the young men weren't too picky on style, I decided to make a woodsy cake with a green chalk board to merge school with wilderness. I think it turned out looking pretty nice and the boys thanked me repeatedly, even after they ate a piece of it. And to my delight, a few came back for seconds and cupcakes too.
Needed:
4 boxes of Chocolate cake mix
4 boxes of White cake mix
3 packets of Duncan Hines Frosting Creations Mint Chocolate
Yellow fondant, red fondant or white fondant that you can tint.
White chocolate colored yellow
Piping bags
Small round tip, Medium round tip, star type tip, frosting scraper
Butter cream frosting (lots of it) I made about 3 batches of it.
Hershey's cocoa powder
Brown tint
small water color style paint brush
To make this full sheet cake, and 120 cupcakes, I used 10 boxes of cake mix. I used 5 boxes of white and 5 boxes chocolate but for the cake I only need 8 boxes. Since I only have One half sheet pan, I decided I'd make two different cakes. I was going to do a chocolate white marble and a chocolate mint marble cake. I figured it gave more selection for the families to choose from. To do the marble effect, I made two boxes of chocolate cake and poured it into a prepared pan and then made the 2 white cake mixes and poured them on top. (* Note~ I cut out paper towels to fit the bottom of my pan and only spray the sides of my pan with cooking spray. Then the cake pops right out and doesn't have a greasy top.) Then I took a butter knife, stuck it into the cake mix and swirled it around a few times from edge to edge lifting the knife up and down every once in awhile. You'll be able to see swirls but don't mix it too much. You want a nice clean marble look. Bake.
For the second cake, I made the two white cakes and mixed in the Duncan Hines Frosting Creations Mint Chocolate packets for a really nice and minty flavor. I poured this on the bottom of the pan. Then I made the chocolate cake and poured it on top of the mint cake and swirled it around with a knife a few times. I baked it until it was ready, about 50 minutes.
When the cake was cool, using a serrated knife, I cut the top off the cake so that it was flush with the pan. This way I got the same size height on my cakes. If your cake is smaller than the pan, you may have to cut them after wards to even them out.
Turn the cake out onto the sheet cake board. If you look really good, you'll see I have thin strips of wax paper at the edges of the board. This is for when I frost it, I can pull the wax paper away afterwards and have a clean board still. That's when I do my finishing touches.
Pull the paper towels off here if you used them.
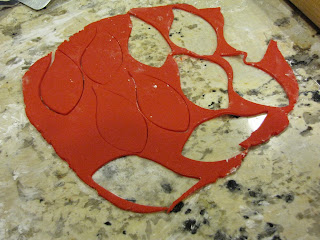
While I was waiting for the second cake to bake, I started on my fondant. Using this large leaf cutter from Wilton, I started making my fire.
I rolled out the red fondant onto a flat surface lightly dusted with cornstarch.
I used a flat and super thin spatula to pick up my fire flames and placed them on wax paper.
Then I made small flames with the smallest cutter. I brushed a small bit of water with a paint brush onto the yellow flames and placed them onto my red flames to dry.
For an added effect, I took left over red and yellow fondant, mixed them together and made these orange flames. I really liked them this color.
So now my second cake was done, so I placed them together, filled it with frosting and trimmed the edges.
Isn't that pretty. =)
I frosted the cake with a scratch coat of un-tinted frosting. Then I took about 2 cups of frosting, added about 1/4 cup of cocoa powder and stirred it until it started to turn light brown but I made sure that there were still bits of chocolate powder throughout. Using a spatula, I frosted the parts shown along with the edges.
Using this scraper tool, I lightly scraped the brown frosting starting at one side of the cake and running it down the frosting to the other side of the cake. Then I took my spatula and very gently went over the frosting again but leaving some of the roughness. I want the frosting to look rough but not too perfectly scraped looking. This is were it starts to look woodsy.
I took a little bit of water and mixed some brown food coloring into it. Using a paint brush, in miscellaneous and random places, I brushed brown lines into the frosting like it shows below.
I did this on the sides and on top. Then I took about 1 cup of white frosting and tinted it forest green, then I spread it nice and evenly in the middle. Using a warm spatula that has been dipped in hot water, I smoothed out the green frosting. (*note~ this is were I remove the wax paper from under my cake edges by pulling gently.) Using excess brown frosting in a piping bag, pipe the edges around the base of the cake. I used an open star tip #32. I also piped s patterns around the chalk board.
I tinted a small amount of white frosting yellow and with a medium round tip, piped the words. For the pine tree branches, I took the brown piping bag with the star tip and made a little branch, then with a super small round tip, took the green frosting and pulled little needles onto the branches.
For my finishing touches, I had made lemon yellow chocolate molds and added them onto my cake along with my fondant flaming fire.
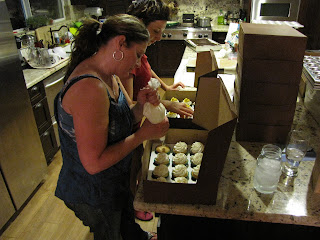
This is me and my lovely daughter at 4am, making cupcakes. See all those boxes. Yikes!
Fireman hats...
...and some flames.
...and here are the lovely men and women that graduated. Our Heroes!
And here is our son. Proud momma I am.
Love our boys (and daughter's too!)


No comments:
Post a Comment
Note: Only a member of this blog may post a comment.